July 29, 2015

Quilt 28: Christmas Cockies Tablecloth - DONE!

Back in May I put up a post about a Christmas table cloth I was working on.  The design is a simple checkboard with a "Cockatoo Santa" print:

The squares are 3" across.
After assembling the checkboard, I went hunting for fabrics for the borders and binding. I was very lucky to find prints that coordinate beautifully. And for backing, I just used scraps of unbleached muslin - nothing fancy.
The quilting on the longarm went quickly.
The binding is a red and white candy-strip. The red doesn't precisely match the red in the checkboard, but it's far enough away that you don't see it.
All finished!
There's one thing I would change in this project, and that's the batting. I used polyester for this and it's really a little too stiff. Cotton would have been a better choice, or maybe bamboo. It needs to drape just a little more than it does. But no matter, I'm pleased with it anyway.

July 22, 2015

Quilt 33: Royal Peacock Throw - started

At the quilting convention last April, I came across this bundle of fat quarters:
"Royal Peacock"
I fell in love with the prints - peacock feathers, flowers and medallions, all in soft turquoise, golds, and lavender. I was sure my friend Lil would love the prints - they are so very "her". And she did!

Back a couple of years ago, I completed a kit quilt (purchased at "Patchwork with Gail B") called "Forbidden Palace". It was bright Japanese prints done up in rectangle-shaped "snowball" blocks, using black in the corners and borders for contrast. I love how that quilt turned out and have been wanting to do another one with a different style of prints. These oriental peacock prints are exactly what I've been looking for.

So here's the design:
I haven't decided if I want the dark green going around the center
to be as wide as it's shown here. I'm thinking it might look better
if it's only about an inch or maybe 1.5" wide.
126 blocks, each with four "corners" (another 504 pieces) - so without the borders and binding, we're up to 630 pieces even before adding the borders.
My new work table gives me just enough space to lay out these
blocks. It's a whole lot easier on my back than laying them on the floor!
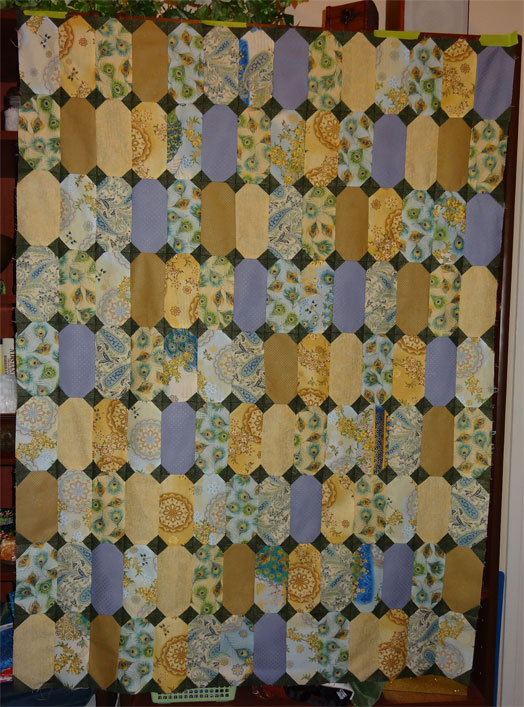
It usually takes me ages to arrange blocks in a project like this, but for some reason it didn't this time. I guess I'm getting better at it.

The center is all together. 630 individual pieces so far.
So far, so good.  Now I need to get just a little more of the dark green (for the first border) and fabric for the second (wider) border and the binding. I showed the results so far to my friend Lil (I'm making this for her) and we talked about what colour that border should be. The design shows it in green, but we agreed that pale turquoise would probably work better.
A close-up of the prints
The quilting will be done with cream thread, and I'm thinking about using my "Baptist Fan" groovy boards.

July 15, 2015

Quilt 31: Civil War (Charm Squares) - "throw" (top assembled)

Oh, I'm such a sucker for charm squares.  I found the ones below at my favorite quilt shop and bought a boatload of them.
Oh... Moda.... you know how to design prints that just seduce me.

And they've been in my UFO closet for something like 18 months. I'd originally thought of a bedspread, but decided it would be too busy and so instead I'm going to make throws.
Some of the squares in the pack
Aren't the colours just glorious?

So here's the design I've come up with for these two throws: Simple. No lattice, just the squares.

My design for the charm squares
And now the hard part - figuring out how to arrange the squares. I really don't want two reds together or two blues together, etc. It took a bit of work to figure out an arrangement that kept all the prints and colours evenly distributed over the quilt.

And now... drumrull... it's BREAKTHROUGH TIME!!!!

One of the things that has driven me nuts on other quilts like this is how to keep all these squares in order as I'm sewing them, and EUREKA!  I've done it!

I pinned the squares in the rows together - and at the start of each row, put in pins to indicate the sequence of the row.  Row one has one pin in the leftmost square. Row two has two pins, and so on. 
The number of pins in the bottom squares record the sequence of the rows.

Oh my goodness... what a difference this pinning made. I was able to just FLY through sewign the pieces together and below is the result.


And now the borders:

Ready to quilt!

July 8, 2015

Tension

I'm having a ball powering through all these projects. WHAT FUN!  But I quickly worked my way through the ones that were ready for the longarm. So I'm back to my regular sewing machine, trying to work up another backlog of tops.

Things were going great - but suddenly the tension on my sewing machine went out. I opened the machine up, checked for buildups of lint, made sure it was oiled properly, then went on. It was OK for a while, but not for long. I finally realized I was going to have to take it in for repair and servicing.

I took it to the service center and was told it would be two weeks (maybe longer?) before it would be done.

Agony!  But what choice to I have?  None, of course. I filled out the paperwork and left the machine.

But - hey... the angels smiled!  Spotlight was having a special on "portable sewing machines". A low-end basic machine from Brother -and at a price so low I had to look twice before I believed it.

"Little Brother"
I thought about it a bit - but the price really was low, so I went ahead. It's certainly a no-frills machine, but all I really need is straight stitching right now.
Like I said: no-frills.  That's OK.  All I really need is stitch number 8.
So my machine is in the shop. I hope it isn't in longer than the predicted 2 weeks, but at least I'm back in the game.

July 4, 2015

Quilt 23: Table Runner for Kathy and Katherine (quilting done)

Last January my friends Kathy and Katherine visited from the US.  Kathy was admiring a table runner I'd made and so I offered to make one for her. Off we went to my favorite quilt supply shop and she selected some lovely fabrics. I pieced the runner fairly quickly, but then got a bit stuck as I contemplated how to quilt it.  This top just screams "longarm" and so I've saved it until now.
All mounted and ready to go.
I'd actually already sandwiched it and pinned it for hand quilting - but thankfully I have the habit of leaving a good bit of extra on the edges, so there was enough backing fabric to allow me to pin it to the longarm leaders.  So I mounted the quilt on the frame and away I went.

I opted for dark green thread, wanting the stitching to show. The backing is light gold, and the stitching REALLY shows there.
I laugh at this photo as it makes me just a bit dizzy to look at it. But what you see
is the quilt from under the longarm. You can see the swirly loop-d-loop stitches I used.
I opted to do loop-d-loop as I'd done on my own table runner a while back. But my tablerunner was too densely quilted and it's a bit stiff. I learned from that and did this one with a little more space between the loops and swirls.
Closeup of the panel, showing the stitching.
I'm very pleased with how it turned out!

And how long did it take?  45 minutes total - and that includes mounting it on the longarm frame.

NOT BAD!!!!!

July 1, 2015

Quilt 32: Antique Rose (charm squares) Baby Quilt (Done)

I've been looking at these charm squares for months and months. I just love the prints, but didn't really want anything made with is for myself. I'd made a baby blanket for my friend Kay's granddaughter, and thought, why not make another one? I knew Kay would adore the prints in these squares.

So I took a chance and grabbed three packets.  As it always does with these projects, it took longer to decide how to arrange the squares than it did to actually stitch them together. Once I got the squares together (below) I showed the project to Kay and, well, she loves it.

I opted for a mint-green print as the border (below).

And here we go - stitching on the longarm.

I'm getting much better with the longarm, and it only took about 3 hours to complete the quilting. And, unlike the other baby blanket, I kept the rows closer together, so there's no obvious gap between them.

Done!

And here's the backing (and the binding, which matches the outer border on the top):
I've really enjoyed making the baby blankets. They are quick, fun to make, and very satisfying to do. Kay collected this one y'day, and the delight on her face really made me smile.